Jenkins - Pipelines as Code
Working with Jenkinsfiles - Agenda
- Move pipeline code to a Jenkinsfile stored in a repository
- Add your own Pipeline
- Adjust the pipeline configuration
- Watch the project build successfully
First steps
For the next part you will create your own fork of the main repository, so here is a short explanation on forks before we start with that.
Fork vs Clone vs Branch
Forks and clones are both copies of a Git repository but there is an important difference:
- A clone is a local copy on your machine, you can work on it and pull, commit and push back into the origin repository.
- A fork is a copy of a repository that is a whole repository in itself. The fork can then be cloned, worked on and versioned in GitLab (or GitHub) without affecting the original source itself.
- Branches in turn are created from a local clone. Usually they are created to develop a specific feature before they are merged back into the original codebase.
In concept an example workflow for effective collaboration could look like this:
- Create your own personal fork
- Clone the fork onto your machine
- Create a branch to develop your feature
- Pull new changes from the original repo and resolve conflicts
- Push everything into your fork
- Create a pull request from your fork to the main project’s repository
This kind of workflow allows every contributor to have a personal git repository and leverage the full advantages of git while not running into conflicts with each other.
For this training we won’t be collaborating on a common project but we will use our forks to be able to work completely independent from each other.
How to create a Fork on GitLab
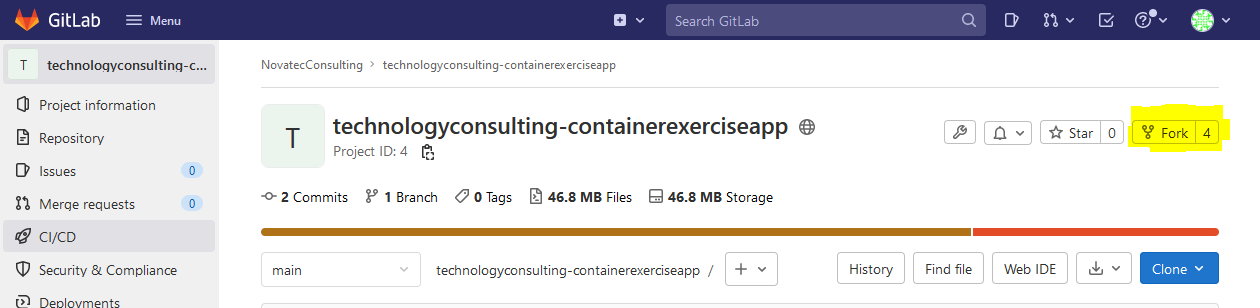
Forking is easily done in a GitLab instance as provided for you for the course of these exercises: Click on Fork in the application’s repository (you will have to Sign in in the upper right corner first if you haven’t already) and choose your namespace in the following screen.
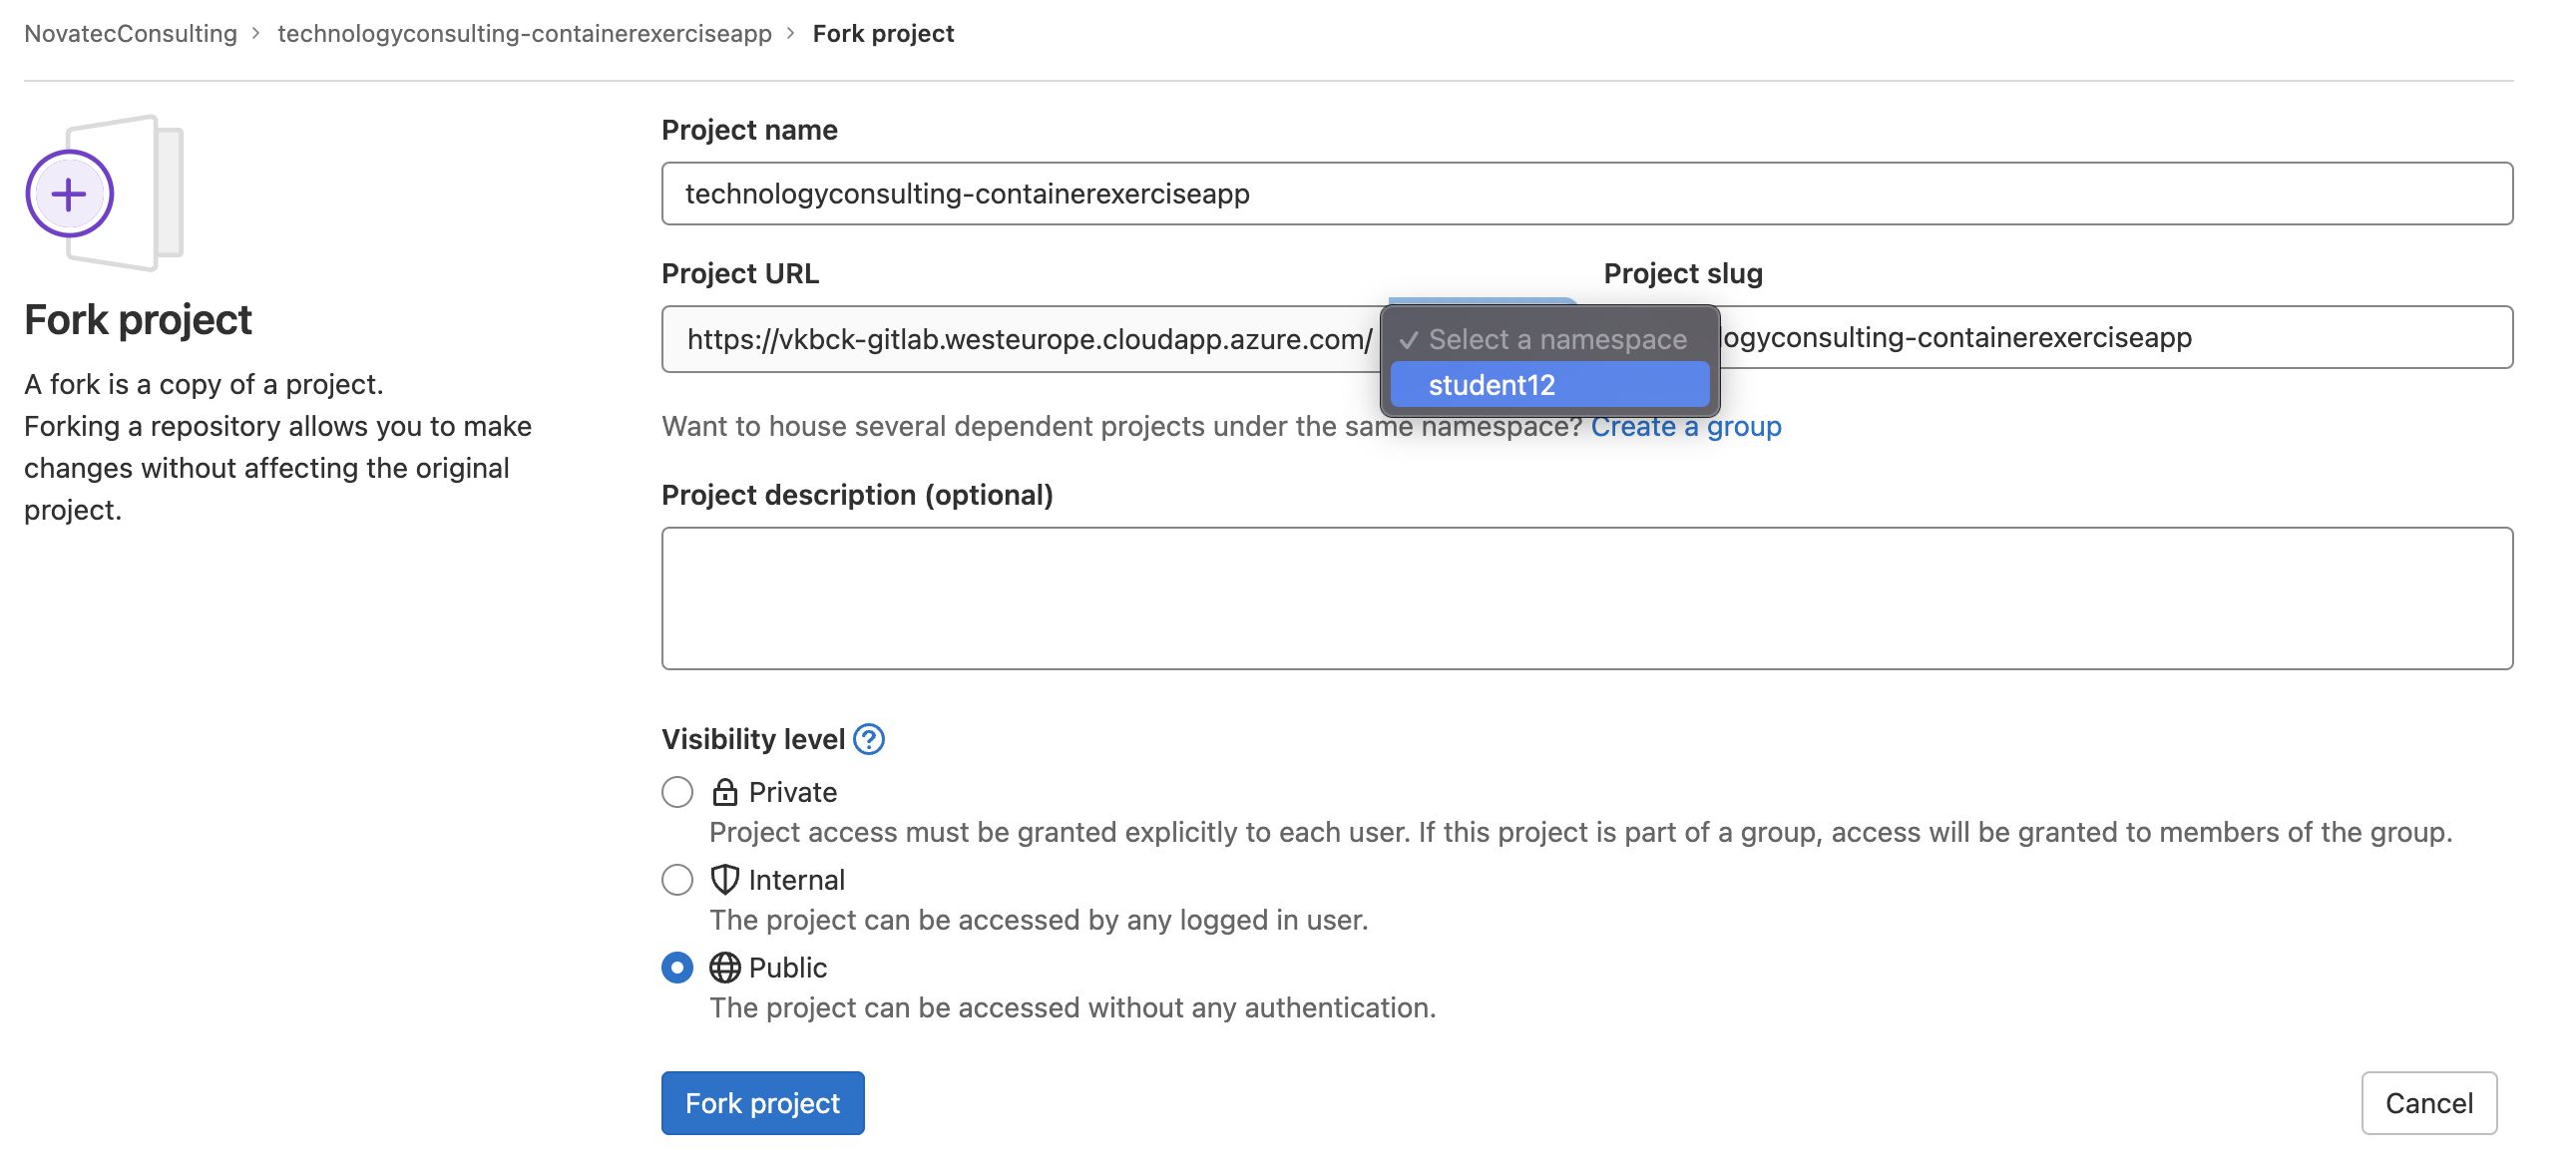
After selecting the Fork button there will be a context menu where you need to select the namespace. Select the one matching your student id, select Public visibility and leave all the other settings at their defaults:
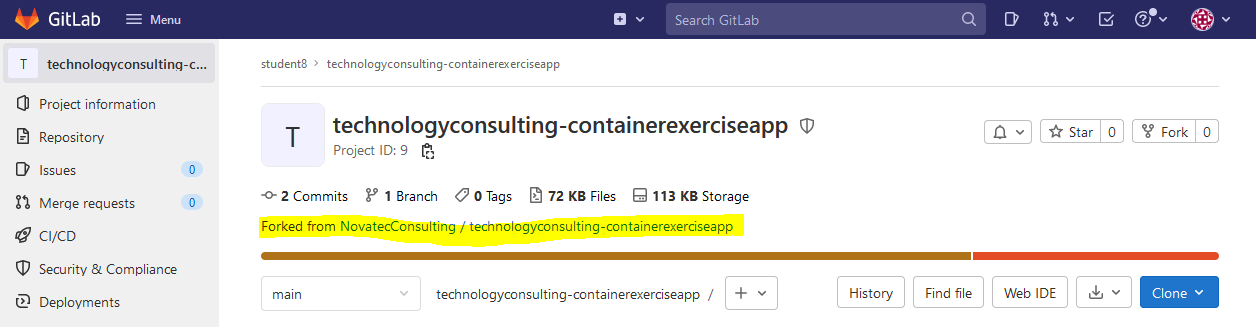
Which should bring you to your fork once completed.
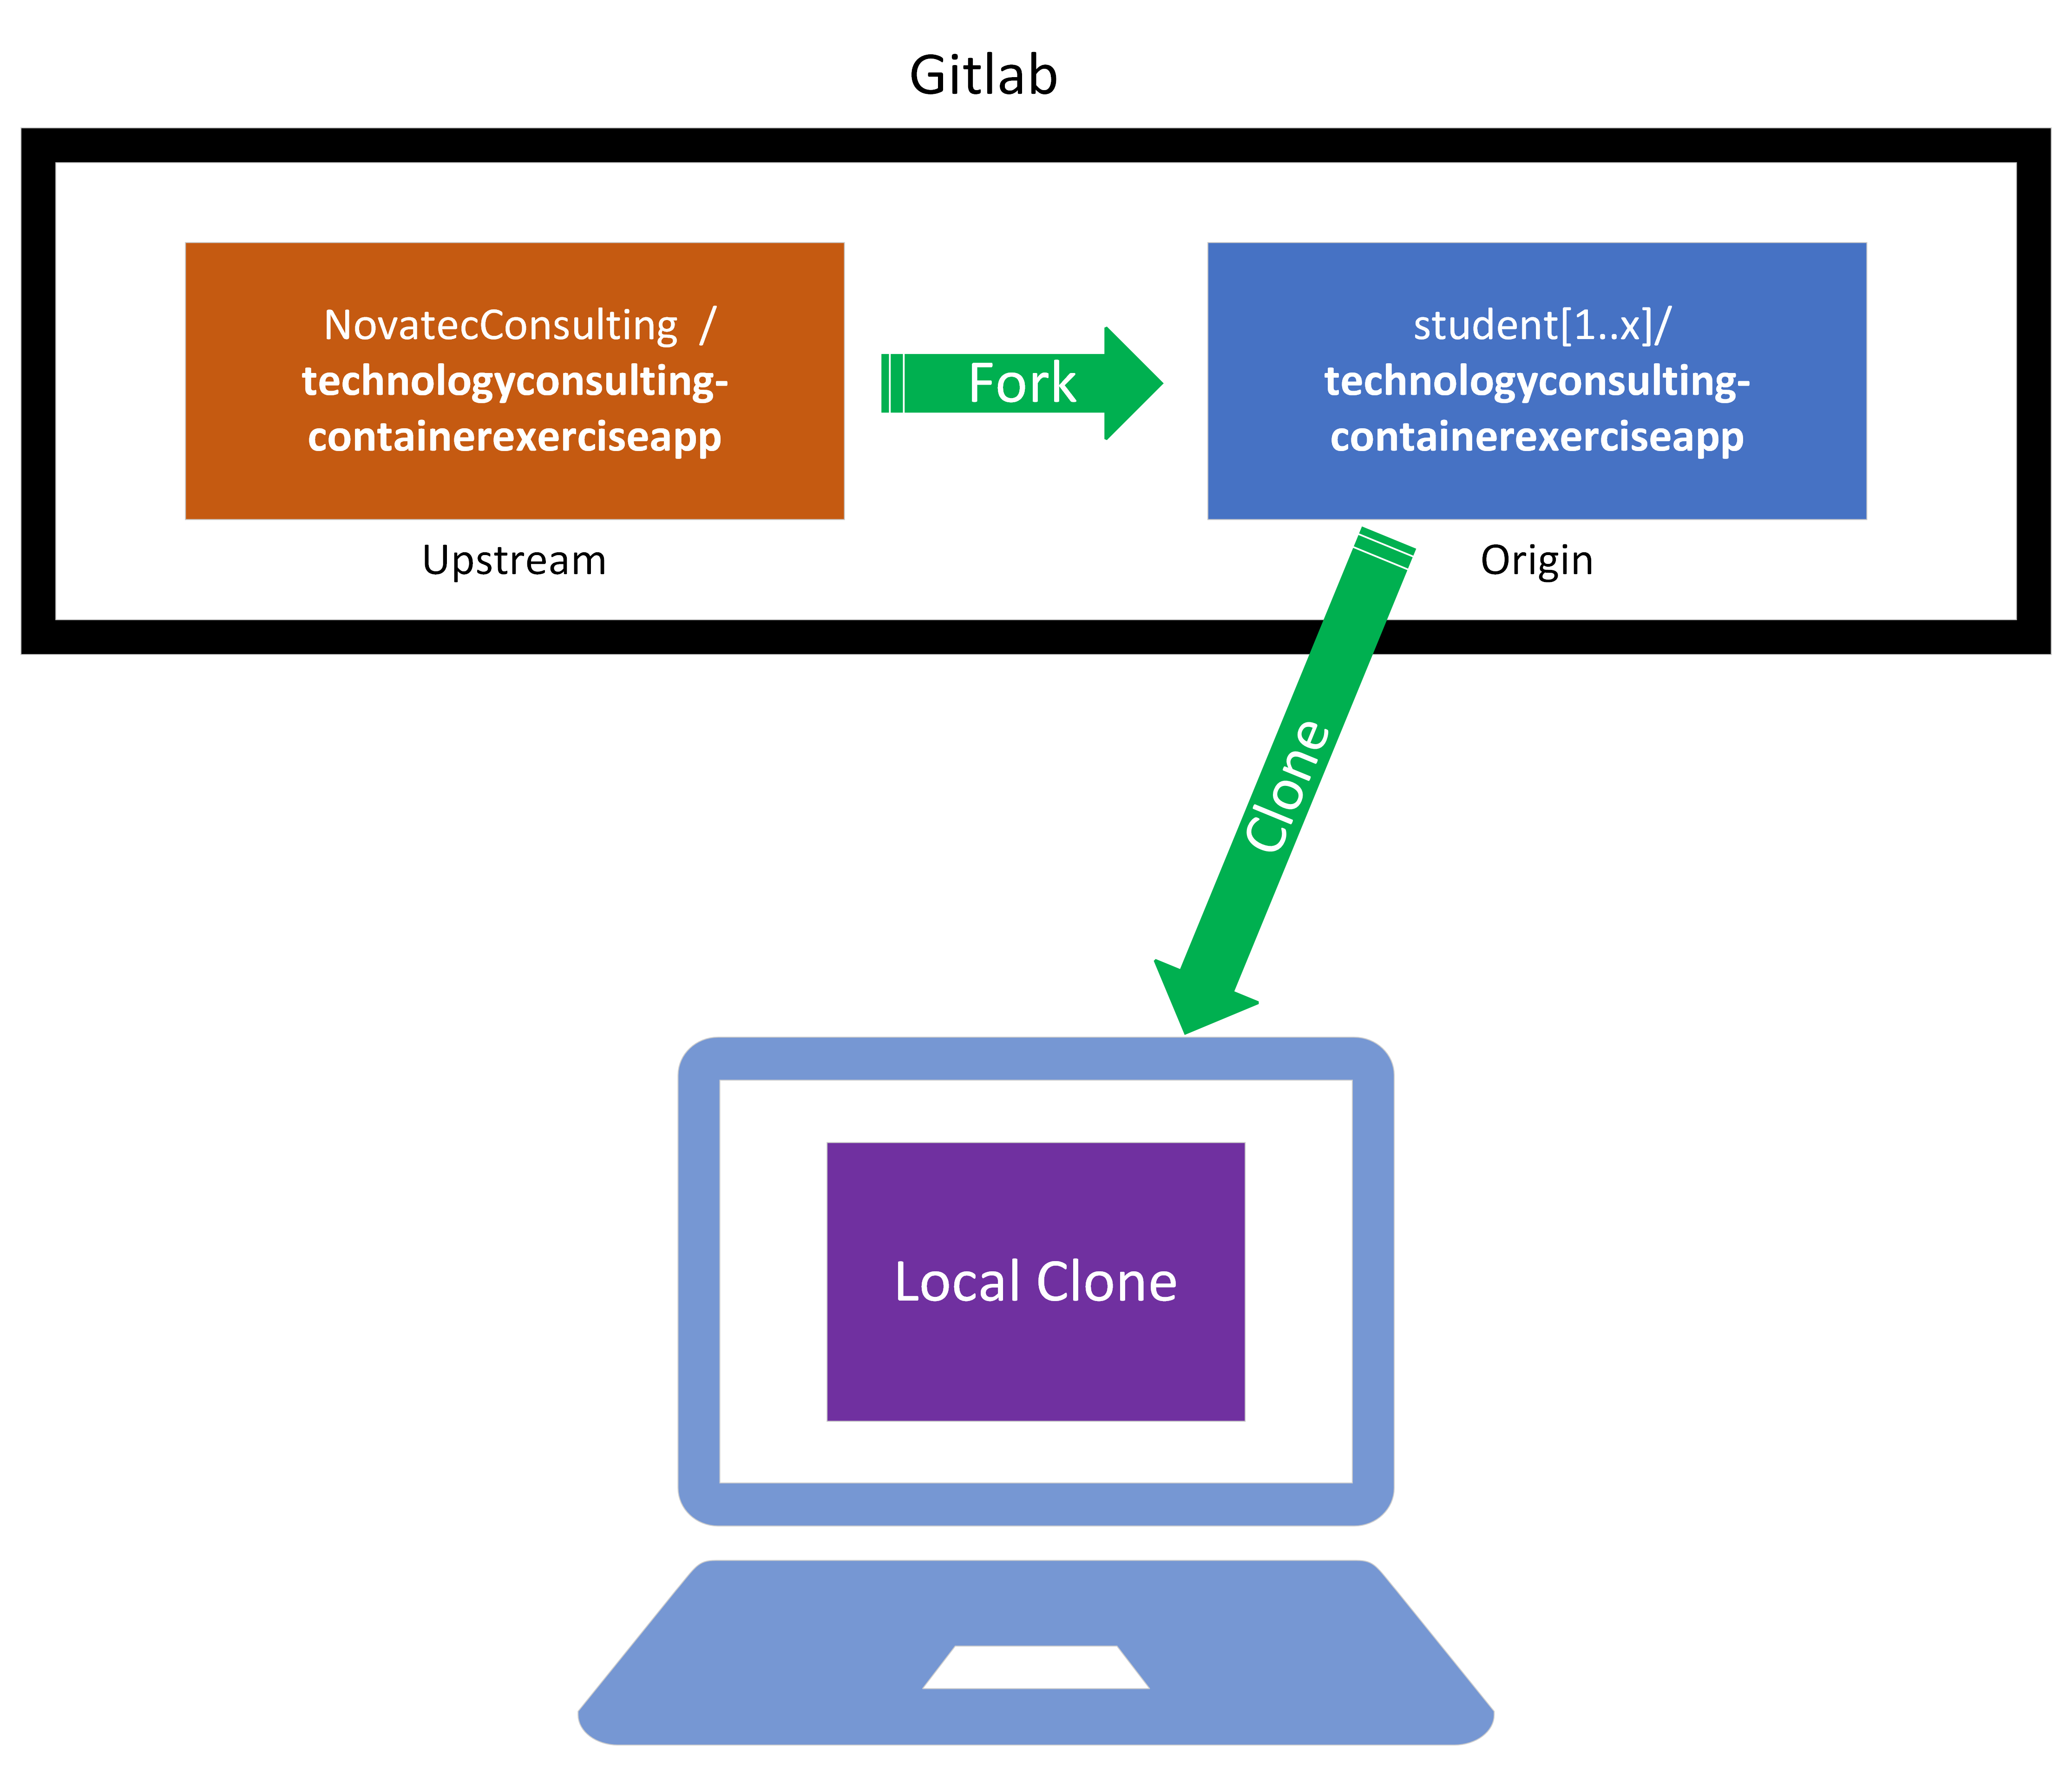
When working with the Git CLI it is important to know that the original repository is referred to as Upstream and the forked repository will be the Origin as seen below:
Prepare a Repository
Now we want to move forward and extract the current UI inline pipelines to a separate Jenkinsfile that will live inside the repository and can be continuously updated with version control.
Info
The pipeline definition will not take place in Jenkins WebUI anymore. Instead, Jenkins will pull the pipeline from your repository. Pipeline as code :-)
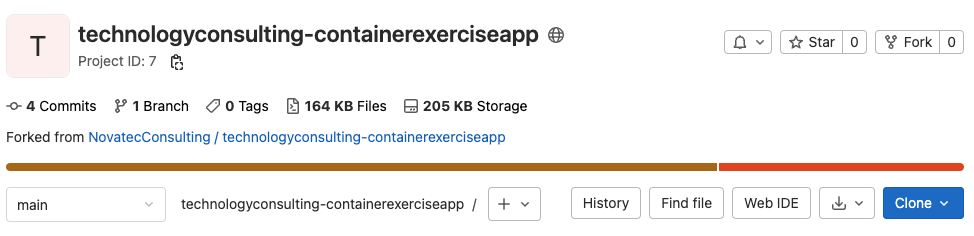
Continue in your forked repository: here you will see the highlighted Clone button to the top right. Select it to display the URL to copy which we will require later on.
Working with the Fork
Going forward we will modify our fork continuously. When doing so, we have the following two options to modify files:
Work with the GitLab UI
GitLab provides integrated editors. This is the recommended approach for fast and easy editing where participants do not require much knowledge about working with git. You can modify files through the User Interface of GitLab which will be updated and present in the repository right away.
If you select this approach, the only thing we have to setup before going further is to create a new file called Jenkinsfile.
In the same row as you have found the clone button, you should see a Web IDE button
Press it to use the WEB IDE which provides you the same look and feel as if you would edit the files locally through VS code or a similar IDE.
Here you want to add a new file called Jenkinsfile.

Now whenever we want to edit the Jenkinsfile through the GitLab UI, select it in the WEB IDE which will show the contents of the file and input your changes. And once you have finalized your changes, you can commit them to your repository via the highlighted area below:

This will upon pressing Commit & Push automatically update the repo with our newly included changes.
Info
When comitting always make sure to commit to the main branch and not to a separate branch specific to the current changes as proposed by GitLab.
Otherwise Jenkins won’t directly “see” your changes and you’d first need to merge the new branch manually.
Now everything is already setup correctly and you can continue to the section Starting off with Jenkinsfiles .
OPTIONAL: Work with a local clone
The other approach would be to create a local clone of your fork on the user VMs, modify required files via the terminal, then use the git CLI to push changes to the remote repository. This approach is only recommended if you are either somewhat familiar with git or want to gain some hands-on experience.
Thus, this section will walk you through that process if you should choose to follow this approach.
Now we have to create a local clone in order to point to our fork as a potential remote repository. Copy the HTTPS URL from the Clone button.
Open the terminal with a connection to your user-vm and run git clone <HTTPS URL TO YOUR FORK>.
Now in your local clone, create a Jenkinsfile that we will edit and push to the remote repository to create Jenkins pipelines from the code repo.
Create a new file by running touch Jenkinsfile.
For now it will stay empty, but note that to edit it later on you can run nano Jenkinsfile.
Now we need to push the newly created Jenkinsfile to our forked remote repository so that Jenkins can find it.
To do so we have to stage the changes we made that we want to push.
This is done with the command git add Jenkinsfile.
Afterwards we want to create a commit in which we bundle the newly added changes git commit -m "Created Jenkinsfile".
The parameter -m “commit message” allows us to describe the changes we have bundled in this commit. So feel free to change the message to your liking.
And finally, run git push to push the changes to your own fork of the git repository.
Going forward, this will be our workflow to update the Jenkinsfile continuously. While we won’t mention the workflow in the later sections again, note that whenever you have to update a file, you can come back to this section to look at the workflow of updating and pushing the changes to the remote repository.
Starting off with Jenkinsfiles
Let’s edit the Jenkinsfile.
First step: get the code that has to be built via Git Checkout. A git checkout command in the Jenkinsfile should look like the following:
podTemplate {
  node(POD_LABEL) {
    stage('Checkout Git') {
      git(
        url: 'https://cpjswd02.gitlab.cloudtrainings.online/NovatecConsulting/technologyconsulting-containerexerciseapp.git',
        branch: 'main',
        credentialsId: 'git_student1'
      )
    }
  }
}
Info
Please make sure you update the URL matching your own fork and the credentialsId with that of your account name.
Otherwise the changes in your own fork won’t get picked up by Jenkins.
Example: replace NovatecConsulting and student1 with student7 if you are student7.
Edit Pipeline in Jenkins
Now if we want to have a Jenkins pipeline that builds our repo we need the pipeline to be created based on that Jenkinsfile. So let’s create a new pipeline.
We want our pipeline name to be unique among all participants’ pipelines in order to identify our own pipeline and to not override any of the others, we want to prefix the pipeline name with a unique identifier such as your user-login studentX with the X representing your individual number.
For example a good pipeline name would be student1_pipelineAsCode.
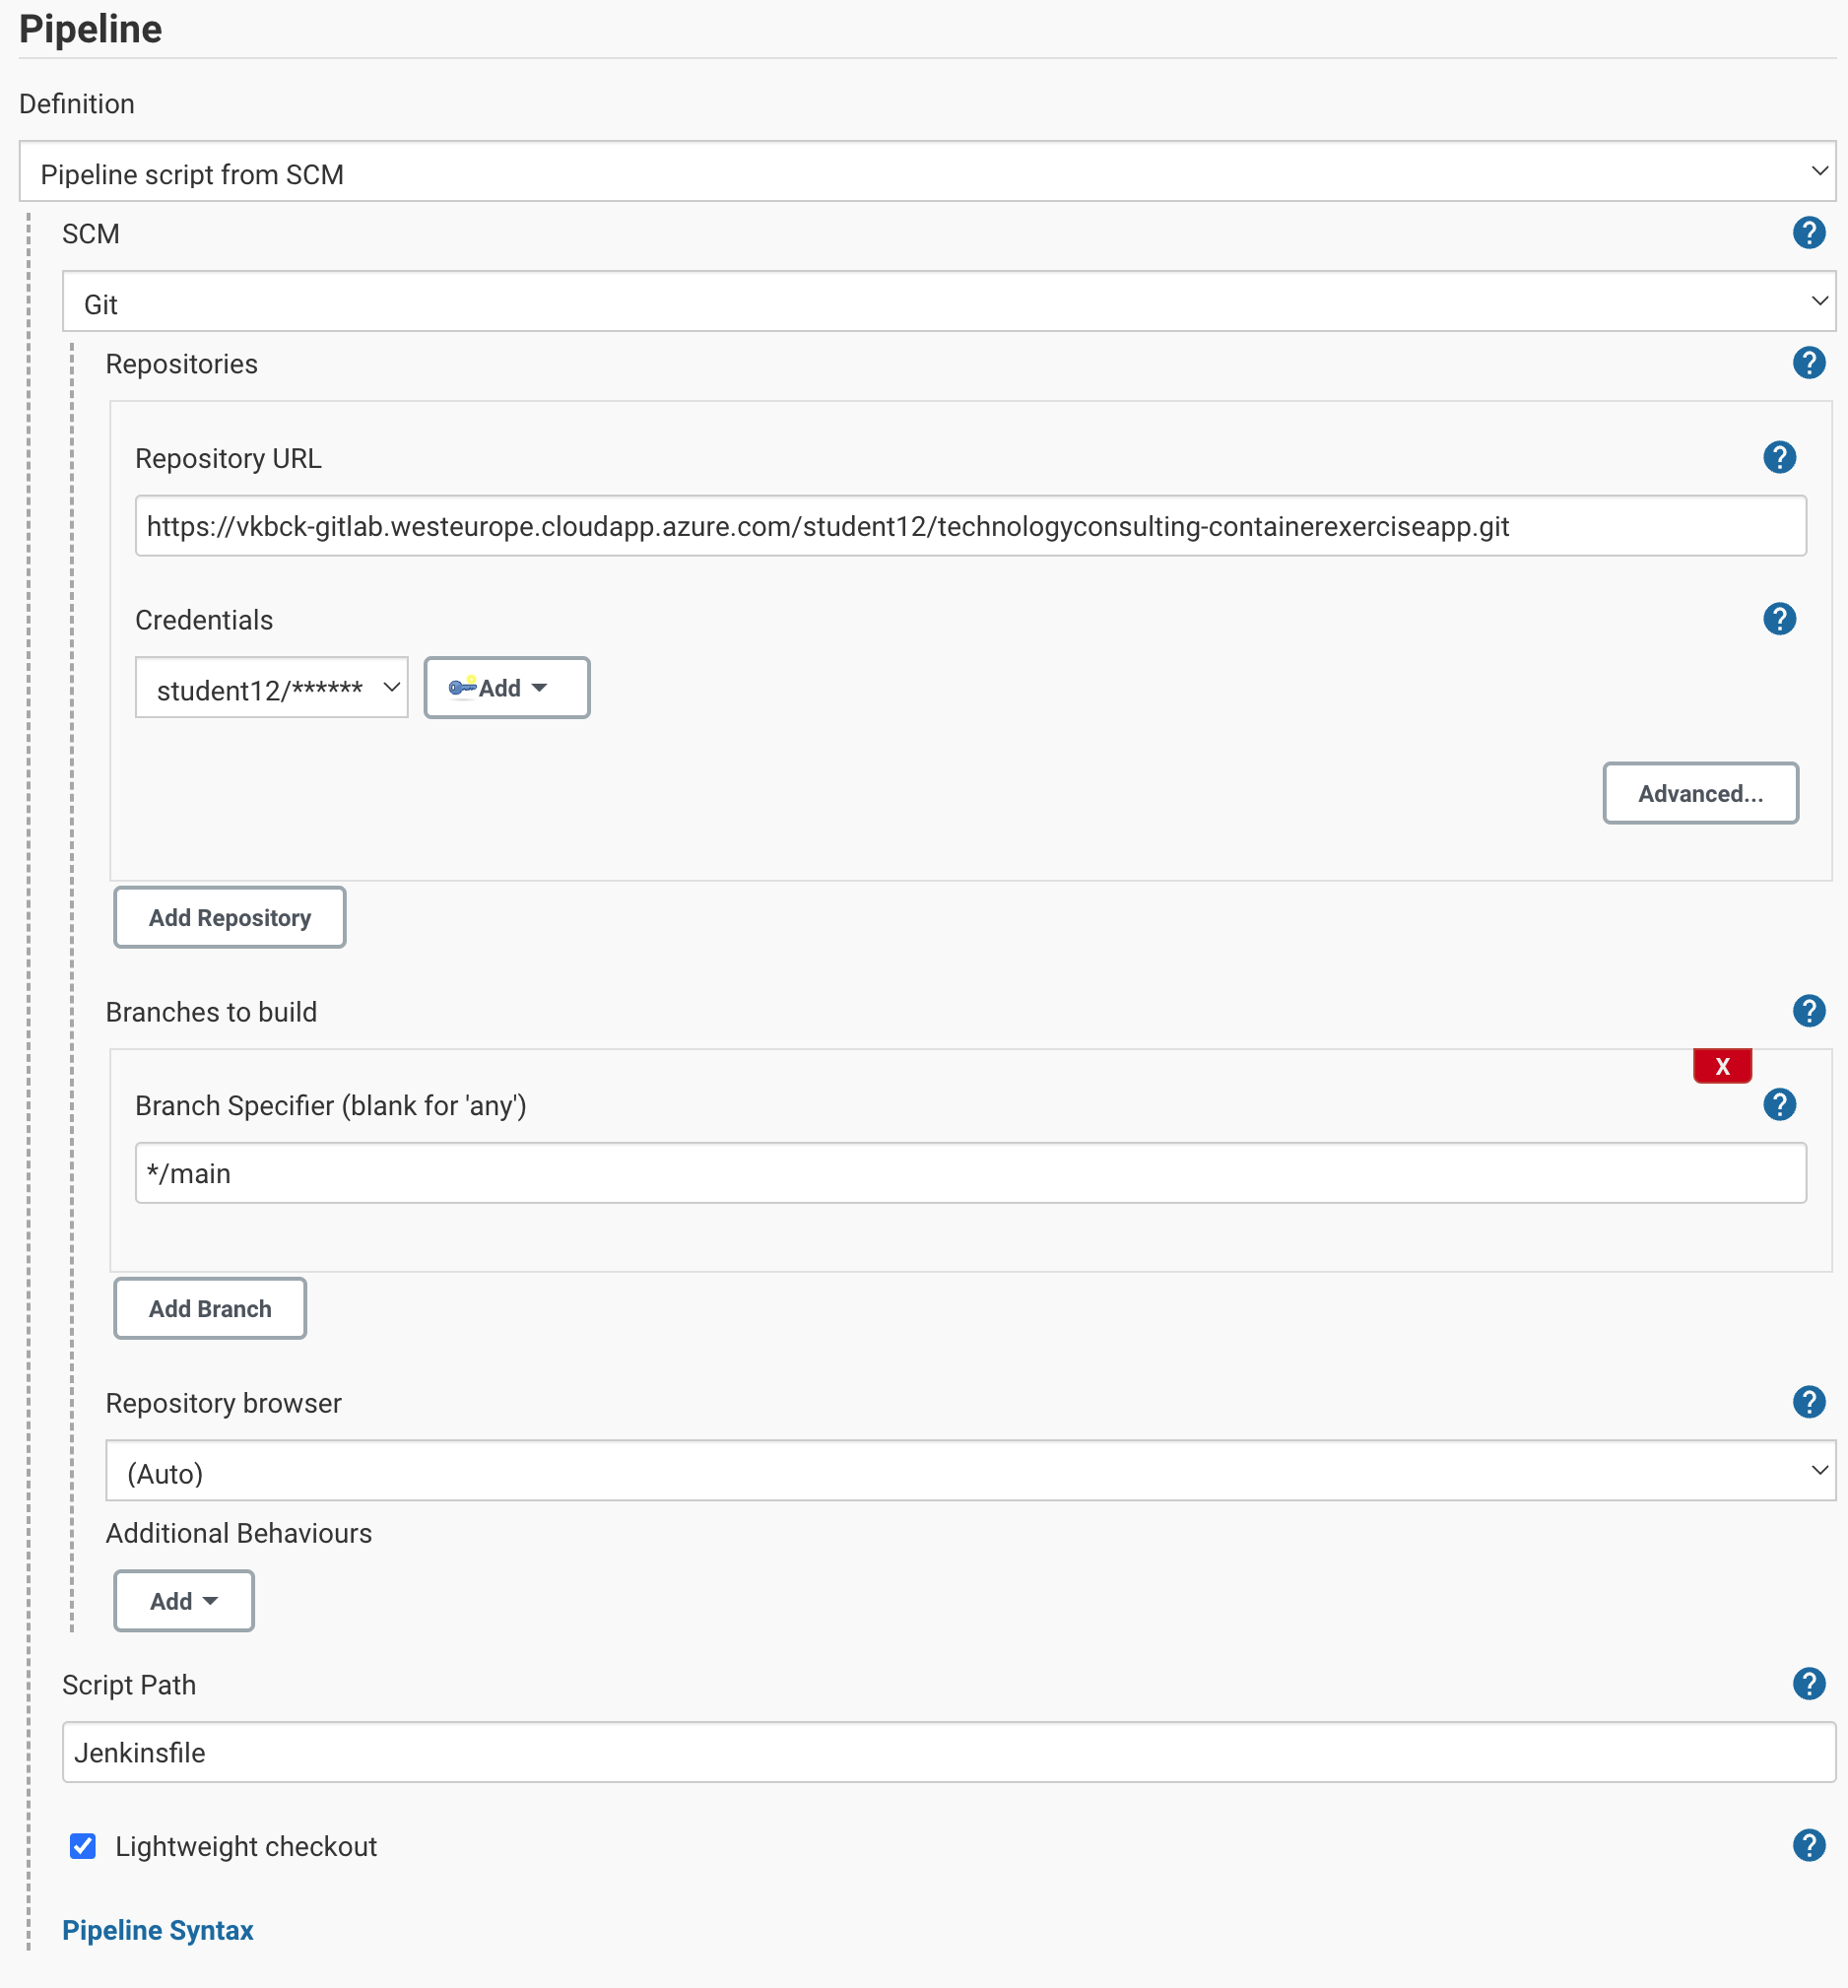
Same steps as in previous chapters, but instead of pipeline script, we want to select Pipeline script from SCM and input the desired URL for your GitLab repo along with the provided credentials.
Info
Please make sure you update the URL matching your own fork and the Credentials with that of your account name.
Otherwise the changes in your own fork won’t get picked up by Jenkins.
Example: replace NovatecConsulting and student1 with student7 if you are student7.
You can leave the credentials at - none - if you have created a public repository, as we won’t push any changes from Jenkins to the repository. Otherwise select those matching your studentX.
Info
Make sure that you use branch main. Jenkins defaults to master whereas GitLab defaults to main, so this needs adjustment.
Save the pipeline.
Then go back to Jenkins and start a new build run of the pipeline and watch if it checks out our repository.
This is nothing spectacular so far, but now we have the setup to continuously update our Pipeline easily from the repository.
Maven build stage
Now let’s try to define a pipeline that takes the content of that repo and runs a maven build on it, much like we did in the previous Jenkins Introduction chapter. So once again we need:
- the container template for maven
- a stage in which we build the todobackend component
- a directory instruction
- the
mvn clean packageshell command with the--batch-modeand also with the-Dspring.profiles.active=devflag as we will now include the tests from the previous chapter as well.
Putting everything together will look as follows
podTemplate(containers: [
  containerTemplate(name: 'maven', image: 'maven:3.8.7-eclipse-temurin-17-alpine', command: 'sleep', args: '99d')
]) {
  node(POD_LABEL) {

    stage('Checkout Git') {
      git(
        url: 'https://cpjswd02.gitlab.cloudtrainings.online/NovatecConsulting/technologyconsulting-containerexerciseapp.git',
        branch: 'main',
        credentialsId: 'git_student1'
      )
    }

    stage('Build todobackend') {
      container('maven') {
        dir('todobackend') {
          sh 'mvn clean package --batch-mode -Dspring.profiles.active=dev'
        }
      }
    }

  }
}
Info
Please make sure you update the URL matching your own fork and the credentialsId with that of your account name.
Otherwise the changes in your own fork won’t get picked up by Jenkins.
Example: replace NovatecConsulting and student1 with student7 if you are student7.
Let’s see the build in action:
once all the above has been saved into your Jenkinsfile you can open your Jenkins pipeline and start a new build run.
You will see the stage definitions change and your build should run through successfully.
Question: Which version are we building right now? Can you find it in the logs?
[INFO] Building jar: /home/jenkins/agent/workspace/student1_pipelineAsCode/todobackend/target/todobackend-0.0.1-SNAPSHOT.jarWell, it would still take the same version as defined in the application’s todobackend/pom.xml!
Let’s try overriding that version in the command:
      container('maven') {
        dir('todobackend') {
          sh 'mvn versions:set --batch-mode -DnewVersion=0.0.2-SNAPSHOT'
          sh 'mvn clean package --batch-mode -Dspring.profiles.active=dev'
        }
      }
Feel free to let your pipeline run with this configuration and check the results.
Docker Build Stage
Next we’ll attempt to build the docker image. We’ll need a new Container with Docker or another Container Builder installed in it. Since the Jenkins agent is running in Kubernetes, Docker in Docker (“DinD”) is not an easy thing. We’ll use Podman for this task, which has some implications as shown below.
Generally Podman has the exact same commands:
Instead of docker build -t testimage:testtag .
we can use podman build -t testimage:testtag .
Also, we will need to allow the docker container to access the kubernetes containerd engine storage area via a hostpath value for actually storing the resulting Docker Image,
so adjust as follows, keeping the parts denoted by {...} intact as already present:
podTemplate(containers: [
  containerTemplate(name: 'maven', image: 'maven:3.8.7-eclipse-temurin-17-alpine', command: 'sleep', args: '99d'),
  containerTemplate(name: 'docker-builder', image: 'nttb/podman', command: 'sleep', args: '99d', privileged: true)
  ],
  volumes: [
    hostPathVolume(hostPath: '/var/lib/containers', mountPath: '/var/lib/containers')
  ]
)
{
  node(POD_LABEL) {

    stage('Checkout Git') {...}

    stage('Build todobackend') {...}

    stage('Build Docker Image todobackend') {
      container('docker-builder') {
        sh 'podman build -f Dockerfile-todobackend -t technologyconsulting-containerexerciseapp-todobackend:jenkinsbuild1 .'
      }
    }

  }
}
Would this build our docker image as desired? Not yet …
First of all, what version of the todobackend app would be put inside that docker image? How would one figure that out?
Thus now change the dockerfile to receive a build argument and consume it via a variable: the application version as buildVersion
FROM docker.io/eclipse-temurin:17-alpine
RUN mkdir -p /opt/todobackend
ARG buildVersion
WORKDIR /opt/todobackend
COPY todobackend/target/todobackend-${buildVersion}.jar /opt/todobackend/todobackend.jar
CMD ["java", "-jar", "todobackend.jar"]
But please also note the added prefix docker.io/ to our build base image!
Well, this is one implication of using Podman, we need to tell it to refer to regular Docker images as found in the default Docker repository.
Alternatively we could tell podman to just override this FROM via podman build --from ..., but it’s preferrable to fix it at the source, i.e. in the Dockerfile.
And then pass the application version to the build command via --build-arg "...":
sh 'podman build -f Dockerfile-todobackend -t technologyconsulting-containerexerciseapp-todobackend:jenkinsbuild1 --build-arg "buildVersion=0.0.2-SNAPSHOT" .'Again feel free to let your pipeline run with this configuration and check the results.
However, generally we don’t want to hardcode any version into the pipeline. Otherwise, we’d have to change the pipeline every time we want to build a new version of our software. Here’s where the so called “parameters” come into play. In our case we’ll want the version to be given via a parameter in form of a string.
Parameters
To use parameters in Jenkins, we’ll have to do two things. First off, we’ll tell the pipeline that we’d like to have parameters available via the UI. As said before, we want the parameter to be a string:
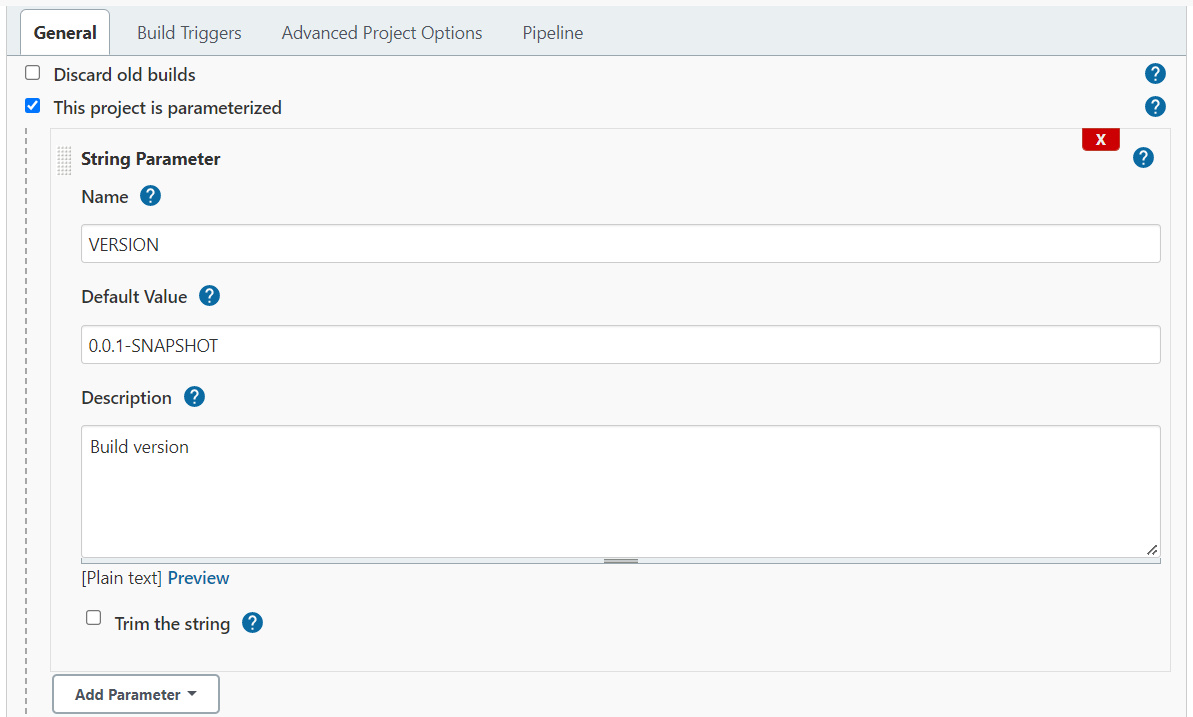
The Jenkinsfile needs to know about this parameter as well. We’ll use the “properties” and “parameters” keywords to achieve this goal, so insert at the very top of your Jenkinsfile:
properties([
  parameters([
    string(name: 'VERSION', defaultValue: '0.0.1-SNAPSHOT', description: 'Build version'),
  ]),
])
We can now access the value of the parameter with the syntax ${VERSION}.
Please note that we use both syntaxes here. Otherwise, parameters with whitespace or other symbols in them will cause problems. So in our case, we want to tell both maven and the docker (well, podman) build task about our version parameter.
sh 'mvn versions:set --batch-mode -DnewVersion=${VERSION}'
[...]
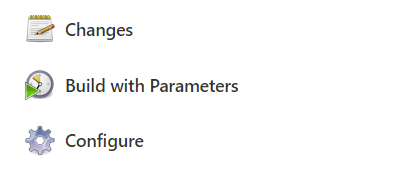
sh 'podman build -f Dockerfile-todobackend -t technologyconsulting-containerexerciseapp-todobackend:${VERSION} --build-arg "buildVersion=${VERSION}" .'After we configured our parameters, you might’ve noticed something about the Build Now button. It says Build with Parameters instead now:
Now trigger the build and take a look at the result. Which version is being used for the maven and docker tasks?
Conditionals/Flow Control
Next we’ll introduce the concept of conditionals and flow control. Imagine that we extended the pipeline to build the todoui as well. The pipeline will then build both projects every time it runs. However, what if we only changed the backend component? What if we don’t want to build the UI component in that case? Here’s how conditions come into play. We can, for example, skip stages based on a given parameter. To showcase this, we’ll add another parameter. However, instead of a string/text parameter, we’ll use a choice parameter now. The choices are building the todobackend, the todoui and building both:
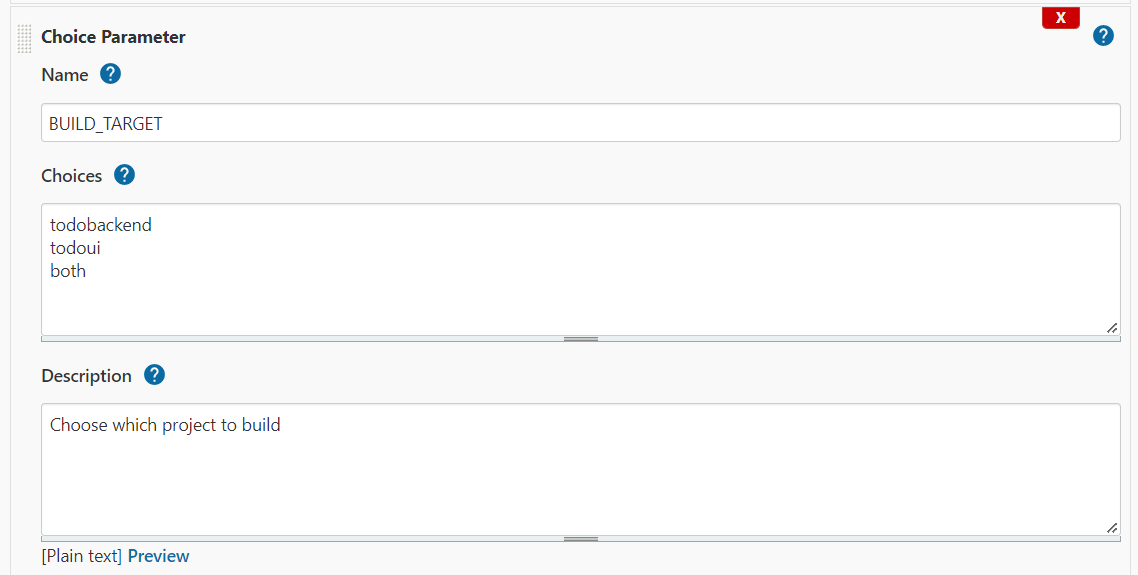
Of course, we’ll have to include this new choice parameter in the Jenkinsfile as well:
properties([
  parameters([
    string(name: 'VERSION', defaultValue: '0.0.1-SNAPSHOT', description: 'Build version'),
    choice(name: 'BUILD_TARGET', choices: ['todobackend', 'todoui', 'both'], description: 'Choose which project to build'),
  ]),
])
Info
A choice parameter doesn’t allow specifying a defaultValue, but it defaults to the first specified choice instead (which may be '' if so desired).
Now, we’ll add a check around the relevant stages. For the case of skipping a stage, we can use the ‘if’ condition:
    stage('Checkout Git') {
      git(
        url: 'https://cpjswd02.gitlab.cloudtrainings.online/NovatecConsulting/technologyconsulting-containerexerciseapp.git',
        branch: 'main',
        credentialsId: 'git_student1'
      )
    }

    if (params.BUILD_TARGET == 'todobackend' || params.BUILD_TARGET == 'both') {

      stage('Build todobackend') {...}

      stage('Build Docker Image todobackend') {...}

    }
    if (params.BUILD_TARGET == 'todoui' || params.BUILD_TARGET == 'both') {

      stage('NotYetImplemented TodoUI Build stage') {
        sh 'echo Not Yet Implemented'
      }

    }
Info
Please make sure you update the URL matching your own fork and the credentialsId with that of your account name.
Otherwise the changes in your own fork won’t get picked up by Jenkins.
Example: replace NovatecConsulting and student1 with student7 if you are student7.
With these preparations in place, the Build with Parameters button should now show you a dropdown menu:
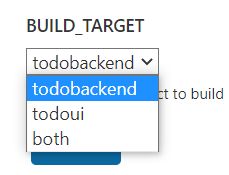
Try using all three values once! What results can you observe?
Parallel Execution
Next, let’s explore how we can improve the efficiency of our pipeline by introducing parallel execution. This approach allows multiple stages to run simultaneously rather than sequentially, significantly reducing the overall pipeline runtime. Imagine that we are building both the todobackend and the todoui. Instead of building them one after another, we can build both projects in parallel. To showcase this, we’ll modify the existing pipeline by using Jenkins’ parallel syntax.
In this case the parameters within properties remain the same as before:
    properties([
      parameters([
        string(name: 'VERSION', defaultValue: '0.0.1-SNAPSHOT', description: 'Build version'),
        choice(name: 'BUILD_TARGET', choices: ['todobackend', 'todoui', 'both'], description: 'Choose which project to build'),
      ])
    ])
Then we need to modify our existing pipeline as follows:
    stage('Checkout Git') {
      git(
        url: 'https://cpjswd02.gitlab.cloudtrainings.online/NovatecConsulting/technologyconsulting-containerexerciseapp.git',
        branch: 'main',
        credentialsId: 'git_student1'
      )
    }

    if (params.BUILD_TARGET == 'both') {
      parallel(
        "Build todobackend": {
          stage('Build todobackend') {...}
          stage('Build Docker Image todobackend') {...}
        },
        "Build todoui": {
          stage('NotYetImplemented TodoUI Build stage') {
            sh 'echo Not Yet Implemented'
          }
        }
      )
    } else if (params.BUILD_TARGET == 'todobackend') {
        stage('Build todobackend') {...}
        stage('Build Docker Image todobackend') {...}
    } else if (params.BUILD_TARGET == 'todoui') {
        stage('NotYetImplemented TodoUI Build stage') {
          sh 'echo Not Yet Implemented'
        }
    }
This setup optimizes build efficiency by combining sequential and parallel execution. The todobackend stages run one after the other to maintain build integrity, while the todoui build runs in parallel when both components are selected.
Otherwise only the choosen project will be built. This reduces overall build time while ensuring stability. Conditional logic keeps the process flexible, building only what is necessary.
Error Handling
Imagine you need to build two projects: the todobackend and the todoui. Traditionally, you might build them one after the other, which could take a considerable amount of time.
However, by using parallel execution, we can build both projects simultaneously, significantly speeding up the overall process.
But what happens if one of the builds fails? We don’t want that to stop the entire pipeline. This is where error handling comes into play. In Jenkins, we have two primary ways to handle errors. Both methods will be showcased.
catchError allows us to catch errors without stopping the pipeline. This means that if one of the stage builds fails, the pipeline continues running, but the build will be marked as unstable.
We can continue with the other stages, keeping the overall flow intact. catchError can be used individually for every stage within the pipeline:
    stage('Build todobackend') {
      catchError(buildResult: 'SUCCESS', stageResult: 'UNSTABLE') {
        {...}
      }
    }
Whereas try-catch gives us finer control over error handling, which is useful for more complex workflows where we need to manage different types of errors in specific ways or need a detailed feedback of the occurred error.
Similarly, try-catch can be used for every stage within the pipeline:
    try {
      stage('Build todobackend') {
        {...}
      }
    } catch (err) {
        echo "Caught: ${err}"
        throw e
    }
Both methods have their usecases and offer a solution to handle different types of errors. As a result you have more control over the behaviour of your pipeline and the flow.
Integrating Slack Notifications for Build Status Updates
Now that we’ve covered error handling, it’s important to ensure that failures—and successes—don’t go unnoticed. In a CI/CD pipeline, timely communication is crucial. This is where Slack notifications come into play.
NOTE: This is a demo to illustrate the concept. In practice, Slack notifications should be configured for your specific environment.
By integrating Slack into a Jenkins pipeline, you can automatically send updates to a designated Slack channel whenever a build succeeds or fails. This keeps the team informed and allows for quick troubleshooting in case of issues.
Prerequisites
Before adding Slack notifications, some configurations are required.
1. Install the Slack Notification Plugin in Jenkins
First we need to install the slack notification plugin on our jenkins server:
- Navigate to Manage Jenkins -> Manage Plugins.
- Under the Available tab, search for Slack Notification Plugin and install it.
- Restart Jenkins if required.
2. Create a Slack App & Generate a Webhook
Now it is necessary create a slack app and generate a webhook
- Go to api.slack.com/apps and click “Create New App”.
- Click “From an app manifest”.
- Select your Slack workspace of your organization.
- Delete the default example manifest and switch to the YAML tab.
- Paste the following configuration:
display_information:
  name: Jenkins
features:
  bot_user:
    display_name: Jenkins
    always_online: true
oauth_config:
  scopes:
    bot:
      - channels:read
      - chat:write
      - chat:write.customize
      - files:write
      - reactions:write
      - users:read
      - users:read.email
      - groups:read
settings:
  org_deploy_enabled: false
  socket_mode_enabled: false
token_rotation_enabled: false- Click “Next”, then “Create”.
- Click “Install App to Workspace” and “Allow”.
- Navigate to “OAuth & Permissions” in the sidebar.
- Copy the Bot User OAuth Access Token.
3. Configure Slack in Jenkins
The last prerequisite-step is to make use of this access token, in order to configure slack within the jenkins environment.
- Go to Manage Jenkins → Configure System.
- Locate the Slack section.
- Click “Add” to create a new “Secret text” Credential using the Bot User OAuth Token.
- Select the newly created Secret text in the dropdown.
- Add a default Slack channel (this can be removed after verifying the setup).
- Tick the “Custom slack app bot user” option.
- Invite the Jenkins bot user into the Slack channel(s) where notifications should be sent.
- Click “Test Connection” to verify that Jenkins can send messages to Slack.
Integrating Slack Notifications into the Pipeline
Now that Slack is configured in Jenkins, you could integrate it into a pipeline to send notifications about the build status. The goal is to automate communication and ensure that the team is immediately informed about build results without manually checking Jenkins.
To integrate this, you can use the slackSend function, wrapped in a try-catch block, which could look like this inside of a pipeline:
try {
  if (params.BUILD_TARGET == 'both') {
    parallel(
      "Build todobackend": {
        stage('Build todobackend') { sh 'echo Building todobackend...' }
        stage('Build Docker Image todobackend') { sh 'echo Building Docker Image...' }
      },

      "Build todoui": {
        stage('NotYetImplemented TodoUI Build stage') { sh 'echo Not Yet Implemented' }
      }
    )
  } else if (params.BUILD_TARGET == 'todobackend') {

        stage('Build todobackend') { sh 'echo Building todobackend...' }
        stage('Build Docker Image todobackend') { sh 'echo Building Docker Image...' }

  } else if (params.BUILD_TARGET == 'todoui') {

        stage('NotYetImplemented TodoUI Build stage') { sh 'echo Not Yet Implemented' }

  }

  slackSend(channel: '#builds', color: 'good', message: "✅ Build Successful: ${env.JOB_NAME} - ${env.BUILD_NUMBER}")

} catch (Exception e) {

  slackSend(channel: '#builds', color: 'danger', message: "❌ Build Failed: ${env.JOB_NAME} - ${env.BUILD_NUMBER}")
  throw e

}
The slackSend function also enables you to override Jenkins global slack configuration (i.e. the default channel, where messages should be posted on). This setup ensures that every build result is automatically reported to Slack. The try-catch block guarantees that failures are caught and instantly communicated, reducing the need for manual Jenkins monitoring.