Cloud Native with Tekton
Tekton is an open source project that provides a framework to create cloud-native CI/CD pipelines quickly. As a Kubernetes-native framework, Tekton makes it easier to deploy across multiple cloud providers or hybrid environments. By leveraging the Custom Resource Definitions (CRDs) in Kubernetes (cf. Operators ), Tekton uses the Kubernetes control plane to run pipeline tasks. By using standard industry specifications, Tekton provides reusable definitions of a CI/CD pipeline-as-code.
OpenShift 4.1 introduced the concept of OpenShift Pipelines based on Tekton. OpenShift has long provided an integrated CI/CD experience based on Jenkins which is actively used by a large percentage of the OpenShift users. While Jenkins has been a popular choice as a CI engine for many teams, it was designed before the existence of cloud-native paradigms which made it difficult to run in containerized environments like Kubernetes. In contrast, with Tekton there is no CI/CD server to manage and maintain.
Tasks
So, how does Tekton make use of these CRDs? Well, they become the building blocks from which to create pipelines.
First of all, a task, represented in the API as an object of kind Task, defines a series of steps that run sequentially to perform logic that the task requires. Every task runs as a Pod on our Kubernetes cluster, with each step running in its own container.
Try creating an ad-hoc task by executing the following (yes, execute it all at once) in your personal namespace:
kubectl apply -f - <<.EOF
apiVersion: tekton.dev/v1beta1
kind: Task
metadata:
  name: hello
spec:
  steps:
    - name: echo
      image: alpine
      script: |
        #!/bin/sh
        echo "Hello World!"
.EOF
The actual payload here is the single available step with the tiny script containing the infamous “Hello World”, and the output confirms that the task was created successfully:
task.tekton.dev/hello createdLet’s actually run this task now via creating an ad-hoc TaskRun by executing the following (yes, execute it all at once):
kubectl apply -f - <<.EOF
apiVersion: tekton.dev/v1beta1
kind: TaskRun
metadata:
  name: hello-task-run
spec:
  taskRef:
    name: hello
.EOF
and then let’s check its state via kubectl get taskrun hello-task-run:
NAME             SUCCEEDED   REASON      STARTTIME   COMPLETIONTIME
hello-task-run   True        Succeeded   25s         12s
You might at first catch a glimpse of SUCCEEDED=“Unknown” and REASON=“Pending” (or “Running”) if you are quick.
After a short while you will see this TaskRun has indeed succeeded and has been executed in its own Pod named after the
TaskRun, check via kubectl get po --selector tekton.dev/taskRun=hello-task-run:
NAME                 READY   STATUS      RESTARTS   AGE
hello-task-run-pod   0/1     Completed   0          41s
Also let’s take a look at the TaskRun’s logs via kubectl logs --selector tekton.dev/taskRun=hello-task-run, confirming
our “Hello World” has been yielded:
Defaulted container "step-echo" out of: step-echo, prepare (init), place-scripts (init)
Hello World!
And also feel free to take a tiny peek under the hood via
kubectl describe po --selector tekton.dev/taskRun=hello-task-run. You will see two Init Containers (already hinted at
above) preparing the TaskRun and placing the required script contents into volatile mounts of the type EmptyDir, and
then the actual execution of the defined step, all neatly wrapped into various handling logic provided by Tekton.
So far so good. Now let’s dial it up a notch, as such a basic and reusable task can then be used as a building block for a Pipeline.
By the way, you can find plenty more examples of such reusable tasks - ready to be installed into my environment - in the Tekton Catalog , and more general background information in the OpenShift Pipelines Tutorial .
Info
Tasks are namespace-scoped, but they can be installed as ClusterTasks simply by changing their kind. ClusterTasks have a Cluster scope, and they can be installed by a cluster operator and thus be made available to users in all namespaces.
Pipelines
A Pipeline defines a number of tasks that should be executed, and how they interact with each other via their inputs and outputs.
So first of all let’s ad-hoc create another Task by executing the following (yes, execute it all at once):
kubectl apply -f - <<.EOF
apiVersion: tekton.dev/v1beta1
kind: Task
metadata:
  name: goodbye
spec:
  params:
    - name: username
      type: string
  steps:
    - name: echo
      image: ubuntu
      script: |
        #!/bin/bash
        echo "Goodbye \$(params.username)!"
.EOF
So, the counterpart to our “Hello World”, but this time executed not on Alpine but on Ubuntu instead. Feel free to check
its presence via kubectl get task and kubectl describe task goodbye.
However, this time we are not going to instantiate this task on its own but instead we let it run as part of a pipeline.
Thus now tie the two tasks together by executing the following (yes, execute it all at once):
kubectl apply -f - <<.EOF
apiVersion: tekton.dev/v1beta1
kind: Pipeline
metadata:
  name: hello-goodbye
spec:
  params:
    - name: username
      type: string
  tasks:
    - name: hello
      taskRef:
        name: hello
    - name: goodbye
      runAfter:
        - hello
      taskRef:
        name: goodbye
      params:
        - name: username
          value: \$(params.username)
.EOF
I.e. specify individual Tasks by referencing their name via taskRef, optionally defining a specific order in which
they should be run via runAfter.
And instantiate this pipeline via a PipelineRun by executing the following (yes, execute it all at once):
kubectl apply -f - <<.EOF
apiVersion: tekton.dev/v1beta1
kind: PipelineRun
metadata:
  name: hello-goodbye-run
spec:
  pipelineRef:
    name: hello-goodbye
  params:
    - name: username
      value: "Tekton"
.EOF
Again, feel free to check that each Task will run in its own Pod, and you could query them individually. You will find that this time the Pods are named after the Pipeline with their individual task reference appended, i.e.
kubectl logs --selector tekton.dev/taskRun=hello-goodbye-run-hello
kubectl logs --selector tekton.dev/taskRun=hello-goodbye-run-goodbye
However, querying the logs this way is rather unwieldy, as is starting TaskRuns or PipelineRuns via kubectl, which is
why Tekton provides a specialized CLI tool tkn for this.
To see the logs of the whole PipelineRun, use the command tkn pipelinerun logs hello-goodbye-run:
[hello : echo] Hello World!

[goodbye : echo] Goodbye Tekton!
I.e. for each Task and for each step therein you get the log output.
And in the same vein feel free to explore the other resources, e.g.:
tkn task describe helloalso listing the individual TaskRuns this Task has been part oftkn task start goodbyeto trigger another run, also readily hinting at how to retrieve the TaskRun logs (or just directly append the--showlogoption when executing …)- similar convenience access to Pipeline or PipelineRun …
Dashboard
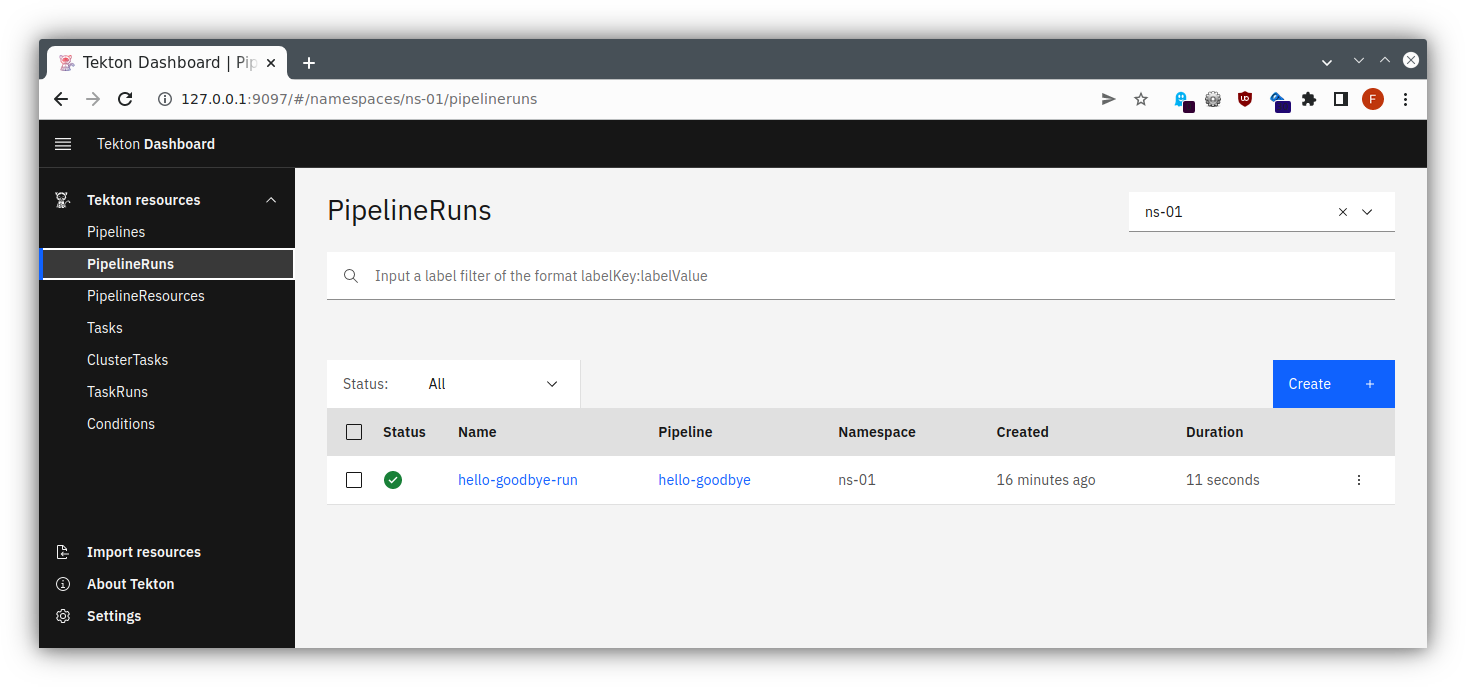
Of course, those lengthy specifications might become unwieldy to read, so there exists a Tekton Dashboard as well, providing some overview and - as installed in our case - allowing us to trigger some actions.
Provide access via port-forwarding
kubectl port-forward -n tekton-pipelines service/tekton-dashboard 9097:9097
(Please note that this requires extended permissions that are normally only deployed when starting with Kubernetes Service Meshes.)
Now you can follow the instructions for the port forwarding within your SSH client, cf. the instructions for Linux / MacOS or Windows . Add a mapping from your local port 9097 to localhost:9097, and then you will be able to access this through your local browser at http://localhost:9097/ , using dual port-forwarding (first via ssh client, then via kubectl), and you should see the application like in the following pictures:
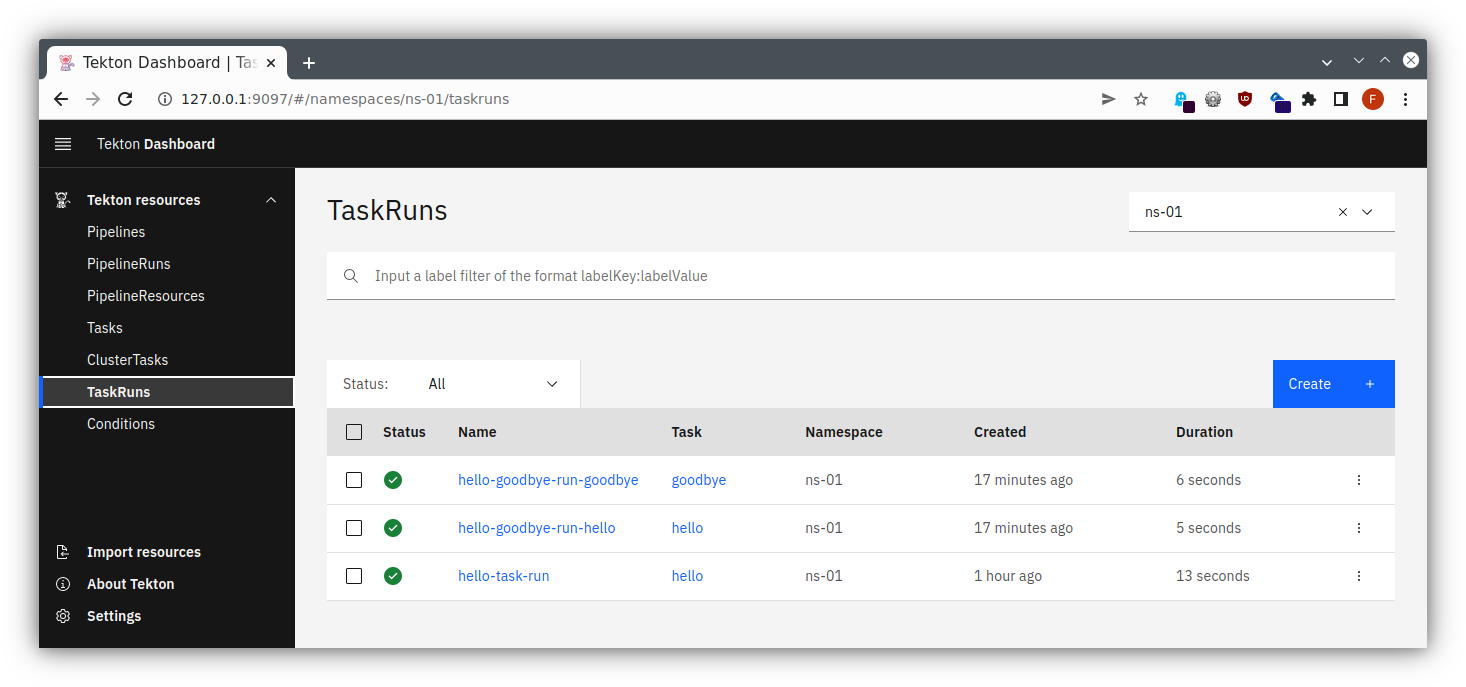

todoapp via Tekton
So, after playing around with Tekton in a rather ad-hoc manner let’s put it to some real use.
You might want to clean up your resources first to get an unobstructed view (could be done via tkn as well, but let’s
do it via kubectl to underline the fact that Kubernetes CRDs are used):
kubectl delete pipelinerun hello-goodbye-run(which will also automatically delete its TaskRuns)kubectl delete pipeline hello-goodbyekubectl delete taskrun hello-task-runkubectl delete task hello goodbye- possibly, for further cleanup:
tkn taskrun delete --all
todoapp Pipeline
Then let’s see whether we can put the necessary building blocks together to build one of our application components via Tekton and to push the resulting Docker Image to Nexus.
For that create a file tekton-pipeline.yaml with
apiVersion: tekton.dev/v1beta1
kind: Pipeline
metadata:
  name: clone-build-push
spec:
  params:
  - name: version
    type: string
    description: The version tag to give the resulting Docker images
  - name: studentId
    type: string
    description: ID of the student
    default: studentX
  workspaces:
  - name: shared-data
  - name: maven-settings
  tasks:
  - name: clone-source
    taskRef:
      name: git-clone
    params:
    - name: url
      value: https://cpjswd02.gitlab.cloudtrainings.online/$(params.studentId)/technologyconsulting-containerexerciseapp.git
    workspaces:
    - name: output
      workspace: shared-data
  - name: build-artifact
    runAfter: ["clone-source"]
    taskRef:
      name: maven
    params:
    - name: MAVEN_IMAGE
      value: "maven:3.8.7-eclipse-temurin-17-alpine"
    - name: CONTEXT_DIR
      value: "todobackend"
    - name: GOALS
      value:
      - clean
      - package
      - --batch-mode
      - -DskipTests
    workspaces:
    - name: source
      workspace: shared-data
    - name: maven-settings
      workspace: maven-settings
  # plain "docker-build" task cannot run as it needs to contact a Docker daemon, hence using buildah here
  - name: build-image
    runAfter: ["build-artifact"]
    taskRef:
      name: buildah # this requires the 'FROM' in ./Dockerfile-todobackend to be prefixed with 'docker.io/'
    params:
    - name: IMAGE
      value: https://cpjswd02.nexus.cloudtrainings.online/todobackend:$(params.studentId)-tekton-v$(params.version)
    - name: DOCKERFILE
      value: "./Dockerfile-todobackend"
    workspaces:
    - name: source
      workspace: shared-data
Warning
Please make sure to substitute your studentId for studentX in the sample file displayed above, e.g. student1.
and apply it via kubectl apply -f tekton-pipeline.yaml.
OK, that was a lot, so let’s take a look at the individual parts:
- this Pipeline takes two parameters:
- the version string needing to be specified and
- the studentId containing a default value that you will need to adjust
- then it specifies two workspaces, that will be used for storing data during a Pipeline run
- and it contains three tasks, each with their own specification
- one for cloning the source from git
- putting it on the “shared-data” workspaces that it expects to find by the name “output”
- one for building the artifact from the source cloned during the first step
- specifying which base image to take for the build and which subdirectory should be handled in which manner
- expecting the source in a workspace called “source” which will be served by our “shared-data”
- also insisting on a separate workspace for all maven settings
- one for building a Docker image containing the newly-built artifact
- specifying how to call the resulting image via the provided parameters, and specifying which Dockerfile to use
- expecting the source artifact and Dockerfile in a workspace called “source” which again will be served by our “shared-data”
- one for cloning the source from git
Passing credentials to Tekton
For actually fully executing the build we will also need to provide credentials for pushing the resulting Docker Image to our registry, i.e. Nexus, so a corresponding Secret will be needed. Thus create a temporary file with the following contents and apply it as usual:
apiVersion: v1
kind: Secret
metadata:
  name: tekton-user-pass
  annotations:
    tekton.dev/docker-0: https://https://cpjswd02.nexus.cloudtrainings.online
type: kubernetes.io/basic-auth
stringData:
  username: <the_username>
  password: <the_password>
Info
You will receive the actual credentials for Nexus from your instructors.
The annotations will tell Tekton for which purpose (docker) and which target
(https://https://cpjswd02.nexus.cloudtrainings.online) these credentials can be used. But we also need to tell Tekton to actually use
this Secret, so we will need to adjust our ServiceAccount to reference it.
Let’s check our list of available ServiceAccounts via kubectl get serviceaccount and adjust the individual one
available per user namespace (i.e. not the default one):
kubectl edit serviceaccount <lab_name>-vm-<your_ID>-serviceaccount
and append the following at the bottom:
secrets:
  - name: tekton-user-pass
todoapp PipelineRun
Now finally trigger a run by creating a file tekton-pipelinerun.yaml containing all runtime information like this
apiVersion: tekton.dev/v1beta1
kind: PipelineRun
metadata:
  name: clone-build-push-run
spec:
  pipelineRef:
    name: clone-build-push
  podTemplate:
    securityContext:
      fsGroup: 65532
  workspaces:
    - name: shared-data
      volumeClaimTemplate:
        spec:
          accessModes:
            - ReadWriteOnce
          resources:
            requests:
              storage: 1Gi
    - name: maven-settings
      emptyDir: {}
  serviceAccountName: <lab_name>-vm-<your_ID>-serviceaccount
  params:
    - name: version
      value: 1
and applying it via kubectl apply -f tekton-pipelinerun.yaml
OK, that was a lot again, so let’s take a look at the individual parts:
- the Pipeline will be referenced via
pipelineRef, similarly to what we had previously seen for Tasks - we need to specify a
podtemplatewith asecurityContextcontaining a certainfsGroup, for the git-clone task expects this - our workspaces will need to be specified
- “shared-data” as a PVC via a
volumeClaimTemplatefor persisting data between individual steps - “maven-settings” as a temporary directory
- “shared-data” as a PVC via a
- the serviceAccountName will make it possible to utilize the credentials that have been attached to it
- and finally our version string parameter
Will this work? Check the output via tkn pipelinerun logs -f clone-build-push-run:
Pipeline <your_namespace>/clone-build-push can't be Run; it contains Tasks that don't exist: Couldn't retrieve Task "git-clone": tasks.tekton.dev "git-clone" not foundD’oh, the Tasks specifications simply haven’t been installed yet. Well, you can find and install these and other reusable tasks via the Tekton Catalog which can easily be accessed using the Tekton CLI:
$ tkn hub search git
NAME                                    KIND   CATALOG   DESCRIPTION
git-cli (0.4)                           Task   Tekton    This task can be used to perform git op...
gogit (0.1)                             Task   Tekton    Send a build status to Gitlab/GitHub.
git-batch-merge (0.2)                   Task   Tekton    This task takes a set of refspecs, fetc...
git-clone (0.9)                         Task   Tekton    These Tasks are Git tasks to work with ...
[...]
$ tkn hub info task git-clone
? Select version: 0.9 (latest)
📦 Name: git-clone

🗂 Display Name: git clone

📌 Version: 0.9

📖 Description: These Tasks are Git tasks to work with repositories used by
 other tasks in your Pipeline. The git-clone Task will clone a repo from the
 provided url into the output Workspace. By default the repo will be cloned
[...]
⚒ Install Command:
  tkn hub install task git-clone --version 0.9
So now just install all the required tasks. Do you know how?
Once these tasks have been installed just re-trigger a run of the pipeline:
kubectl delete -f tekton-pipelinerun.yaml && kubectl apply -f tekton-pipelinerun.yaml, and re-check the output via
tkn pipelinerun logs -f clone-build-push-run.
It should end with pushing the Docker Image to Nexus. Yay!
Info
Of course, triggering runs via such a delete + apply on a statically named PipelineRun seems unwieldy, and luckily the
tkn CLI tool offers a more convenient way to do so, as will be shown below
.
Also feel free to explore which standard Kubernetes resources have been used, such as e.g. Pods
$ kubectl get po
NAME                                            READY   STATUS      RESTARTS      AGE
clone-build-push-run-build-artifact-pod         0/2     Completed   0             60s
clone-build-push-run-build-image-pod            0/1     Completed   0             40s
clone-build-push-run-clone-source-pod           0/1     Completed   0             2m6s
and also how the workspace PVC has persisted over (and even beyond) the PipelineRun, i.e. check kubectl get pvc, pick
the one without a speaking name and then reference “Used By:” in kubectl describe pvc pvc-...:
Used By:       clone-build-push-run-clone-source-pod
               clone-build-push-run-build-artifact-pod
               clone-build-push-run-build-image-pod
todoapp rebuild via tkn
As mentioned there is a more convenient way of triggering PipelineRuns, i.e. via the tkn CLI tool.
First let’s check the previous run, and delete it: tkn pipelinerun list and
tkn pipelinerun delete clone-build-push-run will serve to start with a clean slate (of course,
kubectl delete pipelinerun clone-build-push-run would also still work)
Then let’s create a file tekton-podtemplate.yaml with
securityContext:
  fsGroup: 65532
and a file tekton-shared-data.yaml with
spec:
  accessModes:
    - ReadWriteOnce
  resources:
    requests:
      storage: 1Gi
i.e. each containing an excerpt from the PipelineRun definition that we have seen above.
With these in place we now can trigger another PipelineRun via tkn:
tkn pipeline start clone-build-push \
    --showlog \
    --pod-template tekton-podtemplate.yaml \
    --workspace name=shared-data,volumeClaimTemplateFile=tekton-shared-data.yaml \
    --workspace name=maven-settings,emptyDir= \
    --serviceaccount <lab_name>-vm-<your_ID>-serviceaccount \
    --use-param-defaults \
    --param version=2
i.e. providing the remaining specifications and parameters dynamically (see above for their meaning), which should directly start displaying the logs:
PipelineRun started: clone-build-push-run-hgbhd
Waiting for logs to be available...
[...]
And again, once the run successfully finished, we can examine the standard Kubernetes resources such as the Pods that have been created for the run:
$ kubectl get po
NAME                                            READY   STATUS      RESTARTS      AGE
clone-build-push-run-hgbhd-build-artifact-pod   0/2     Completed   0             77s
clone-build-push-run-hgbhd-build-image-pod      0/1     Completed   0             54s
clone-build-push-run-hgbhd-clone-source-pod     0/1     Completed   0             2m23s
And finally, after we might have triggered several run, tkn makes it easy to clean up:
tkn pipelinerun delete --pipeline clone-build-push --keep 2 # or use "--keep-since" instead
Deploy rebuilt todoapp
And of course, once we are able to easily build new versions of the todobackend, we can also easily deploy those from the same Pipeline.
To investigate this, deploy the todobackend slightly differently by executing the following (yes, execute it all at once):
cat <<.EOF | kubectl apply -f -
apiVersion: apps/v1
kind: Deployment
metadata:
  name: todobackend-tekton
spec:
  replicas: 1
  selector:
    matchLabels:
      app: todobackend-tekton
  template:
    metadata:
      labels:
        app: todobackend-tekton
    spec:
      containers:
        - name: todobackend
          env:
            - name: SPRING_PROFILES_ACTIVE
              value: dev
          image: https://cpjswd02.nexus.cloudtrainings.online/todobackend:studentX-tekton-v2
      restartPolicy: Always
.EOF
Warning
Please make sure to substitute your studentId for studentX in the sample file displayed above, e.g. student1. Yes,
this will deploy an image which has just been built and pushed to Nexus.
This will keep or standard todobackend untouched, allowing us to tinker around with Tekton some more.
Then let’s make another Task available:
tkn hub install task kubernetes-actions --version 0.2
and edit your tekton-pipeline.yaml to extend it as follows:
  - name: deploy
    runAfter: ["build-image"]
    taskRef:
      name: kubernetes-actions
    params:
      - name: script
        value: kubectl set image deployment/todobackend-tekton todobackend=$1
      - name: args
        value:
        - https://cpjswd02.nexus.cloudtrainings.online/todobackend:$(params.studentId)-tekton-v$(params.version)
This will serve to dynamically update our new todobackend-tekton Deployment to use the newly-built Docker image.
Apply it via kubectl apply -f tekton-pipeline.yaml and re-run the Pipeline via tkn as given
above
, setting the “version” parameter as you like.
Once the PipelineRun successfully finishes you can check the container image of the todobackend-tekton Deployment via
kubectl get pod --selector app=todobackend-tekton --output custom-columns=CONTAINER:.spec.containers[0].name,IMAGE:.spec.containers[0].image
It should show the very same “version” that you had provided to the tkn invocation.
Build and push via jib (Optional)
Alternatively, Jib could be used for building the artifact and creating the Docker image containing it in a single step.
So install yet another Task via tkn hub install task jib-maven --version 0.4.
Then edit your tekton-pipeline.yaml, completely rip out the maven and the buildah Tasks and substitute the following
instead:
  - name: build-image
    runAfter: ["clone-source"]
    taskRef:
      name: jib-maven
    params:
      - name: IMAGE
        value: https://cpjswd02.nexus.cloudtrainings.online/todobackend:$(params.studentId)-tekton-v$(params.version)
      - name: MAVEN_IMAGE
        value: "maven:3.8.7-eclipse-temurin-17-alpine"
      - name: DIRECTORY
        value: "todobackend"
    workspaces:
      - name: source
        workspace: shared-data
Apply it via kubectl apply -f tekton-pipeline.yaml and re-run the Pipeline via tkn as given
above
, setting the “version” parameter as you like. It should yield the same result, i.e.
building and deploying our image.
Further outlook
Of course that’s not it yet.
We could use Tekton Triggers to trigger PipelineRuns automatically once the source repository changes, or we could fan out Tasks in a Pipeline via Tekton Matrix , or we could create self-contained builds using Hermetic Execution Mode . There are many options to explore.
And - looking at it from another angle - we could integrate Tekton and ArgoCD for GitOps workflows . Well, the sky is the limit, as they say …